How to install Magento 2 latest version in your Localhost on Windows (2024) – step by step guide
Introduction
Magento 2 is a robust open-source e-commerce platform known for its flexibility and scalability, empowering businesses to create and manage online stores with advanced features and seamless customization.
In this guide, I’ll be walking you through the process of installing Magento 2.4.6 (latest stable version) and all it’s prerequisites: XAMPP, OpenSearch, Composer. Check system requirements.
Step 1 – Setup XAMPP
- Download XAMPP server and run the setup
“For this tutorial we recommend keeping the default installation path”
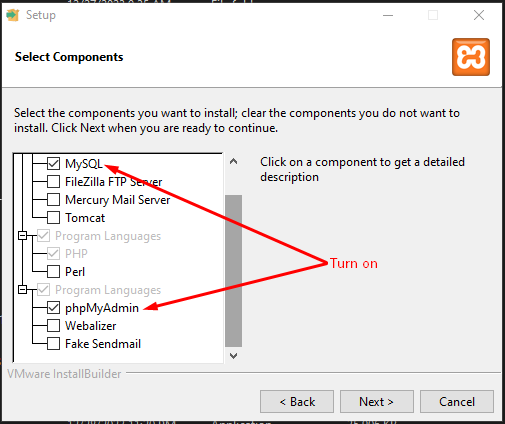
- Turn on the following features and continue.
Configure XAMPP
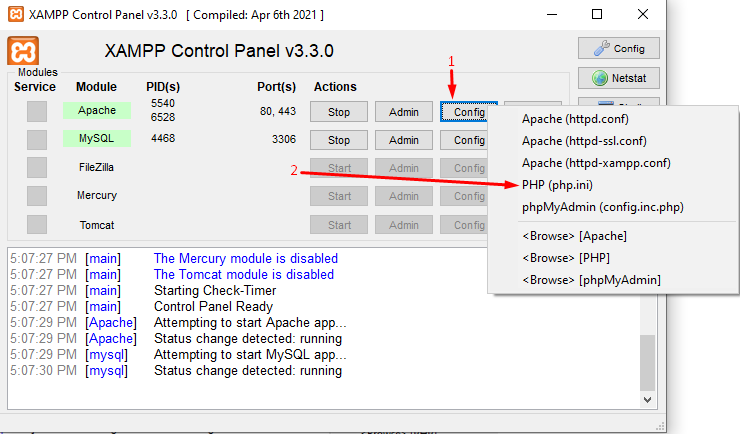
- Access the XAMPP control panel and navigate to the
php.inifile by selecting ‘Config'within the'Apache'tab.
- Then activate the listed extensions by removing the semicolon(;) preceding their names.
extension=intl
extension=soap
extension=sockets
extension=sodium
extension=xsl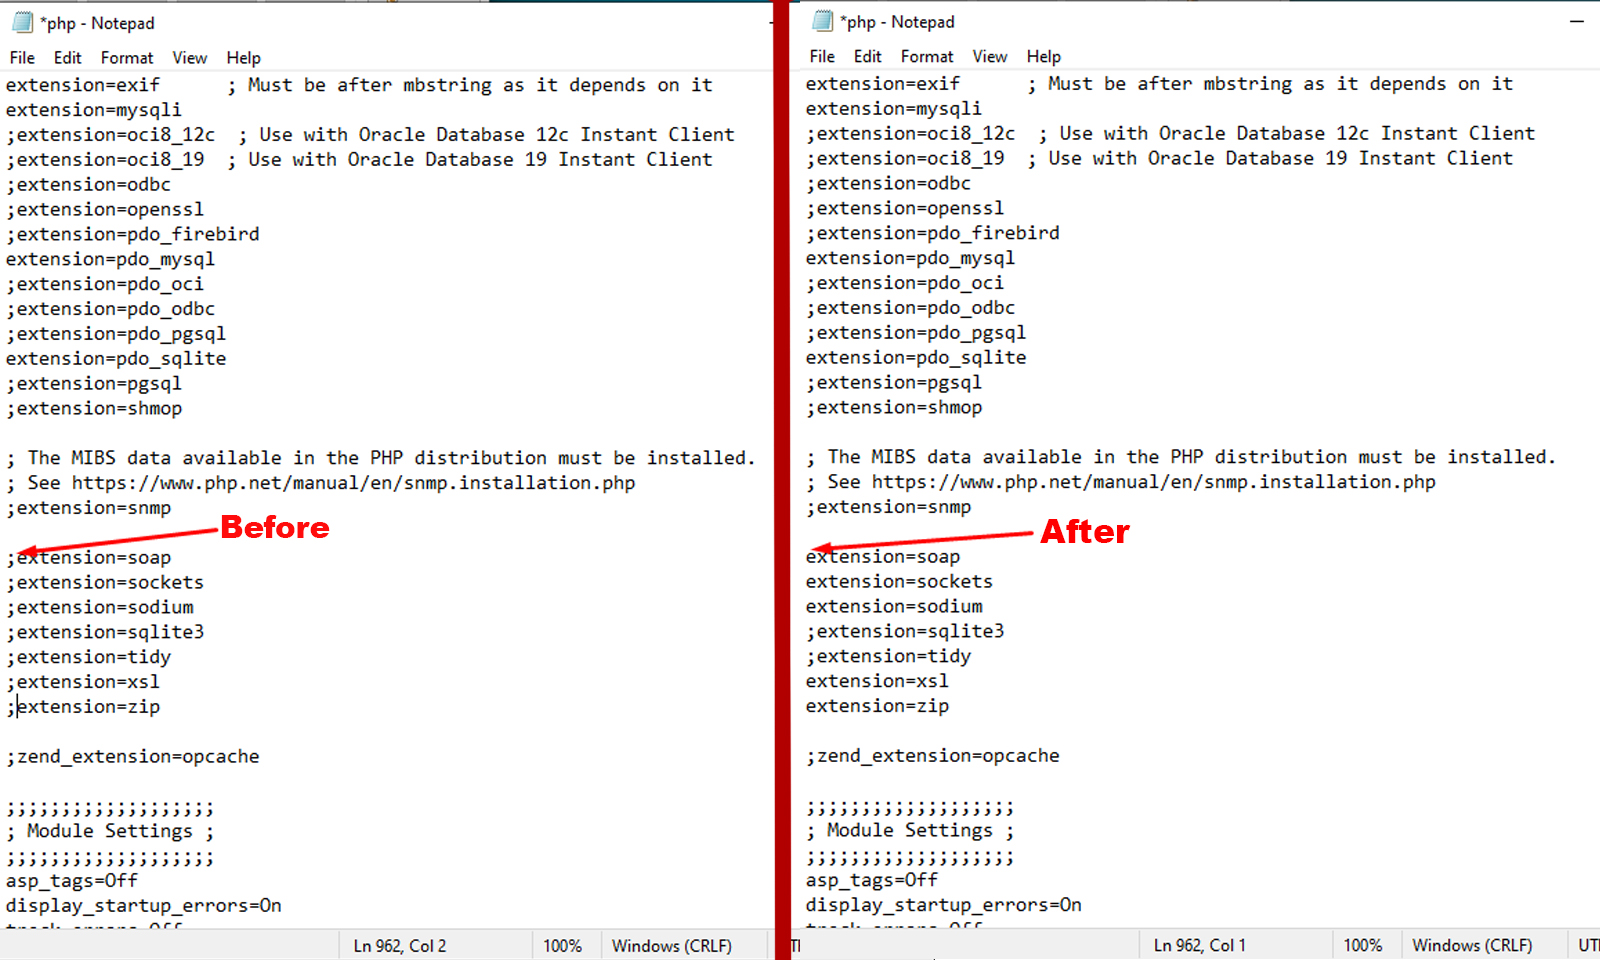
By enabling these extensions, you ensure that Magento 2 has the necessary tools and capabilities to perform essential operations, maintain security, and communicate effectively with various components, both internally and externally. This enhances the overall functionality and performance of your Magento 2 installation.
- Search for memory_limit and adjust its value as instructed, then save the file.
memory_limit=4G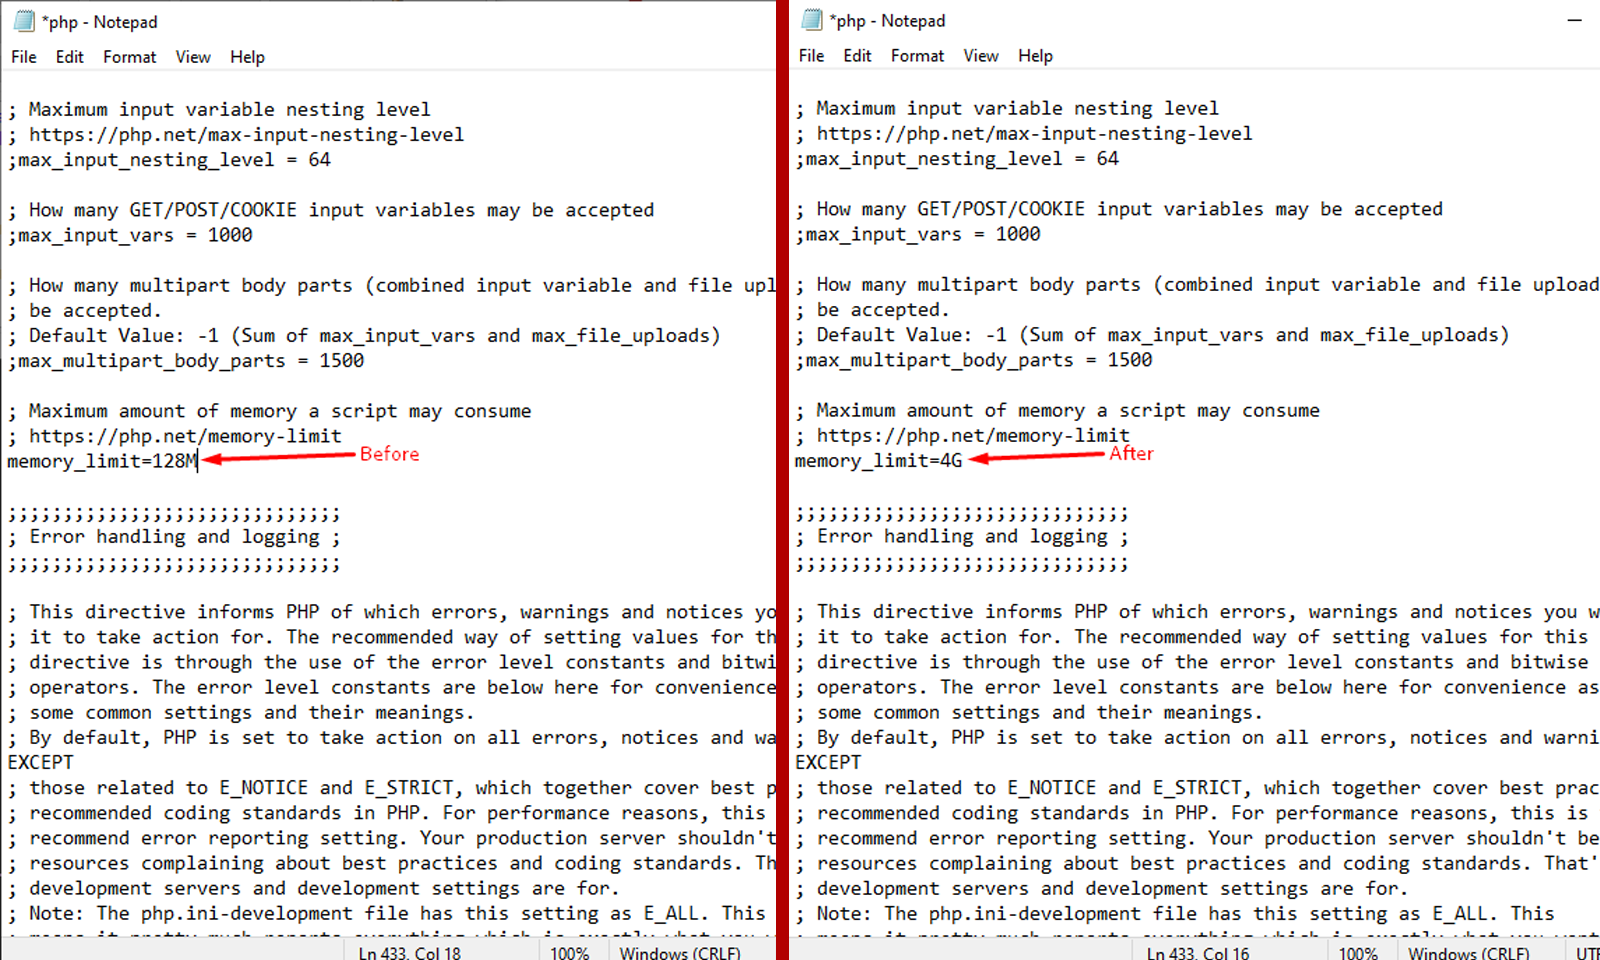
Magento 2 is a resource-intensive application, and the increased memory limit allows the system to handle the complex operation, ensuring a smooth and efficient installation of the Magento 2 platform on your local environment.
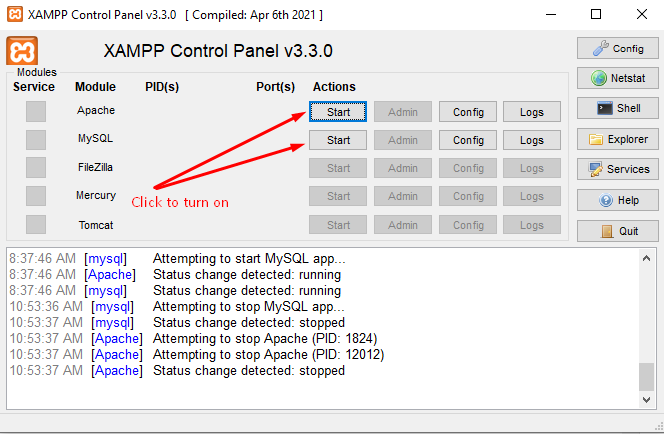
- Click on buttons to turn on
APACHEandSQLservers.
Configure host file
- Navigate to
'C:\Windows\System32\drivers\etc\hosts'and open it using notepad. - Input the provided line then save the document
127.0.0.1 www.localhost.com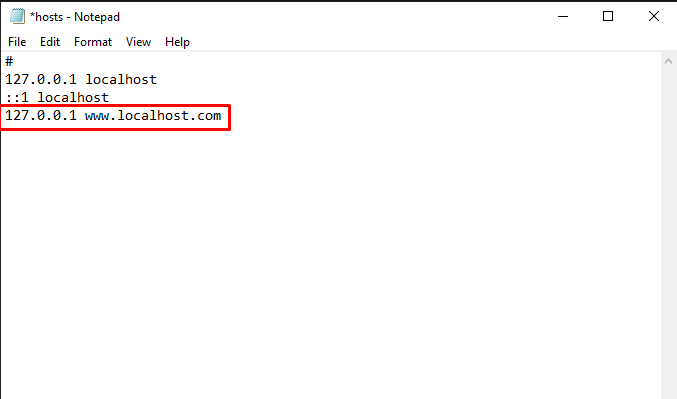
Step 2 – Create the database
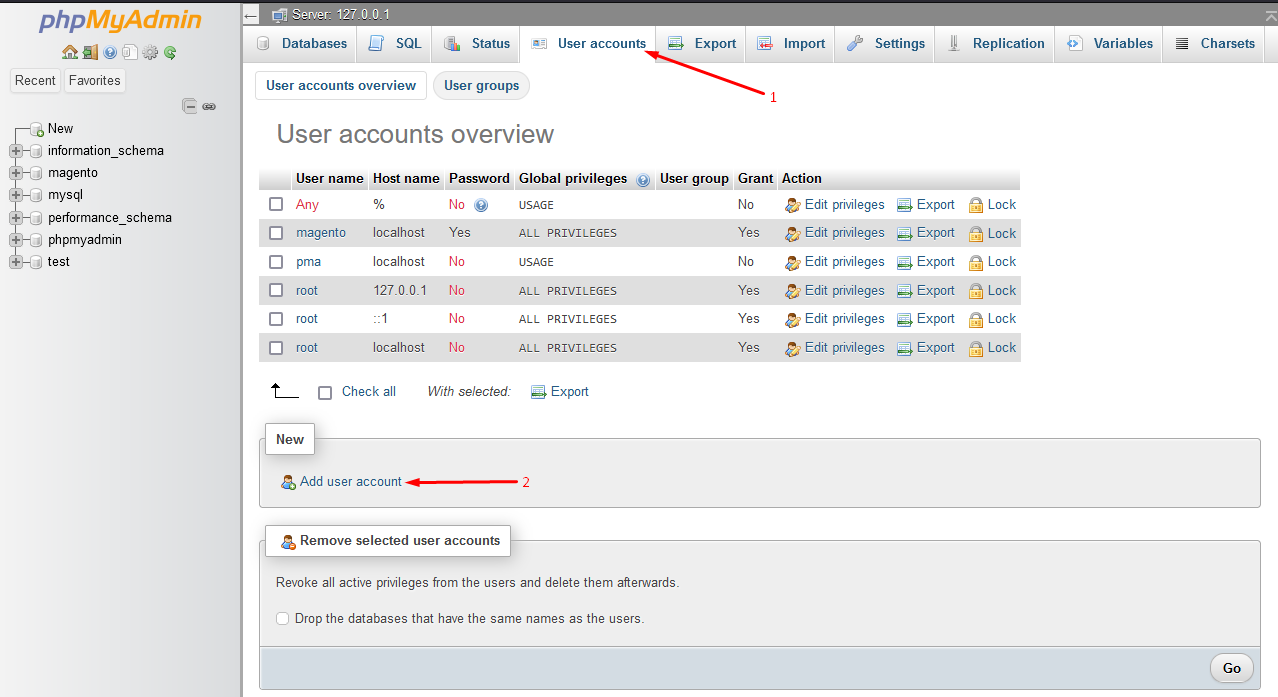
- Open PHP my admin with http://localhost/phpmyadmin.
- Navigate to User accounts tab and select
'Add user'.
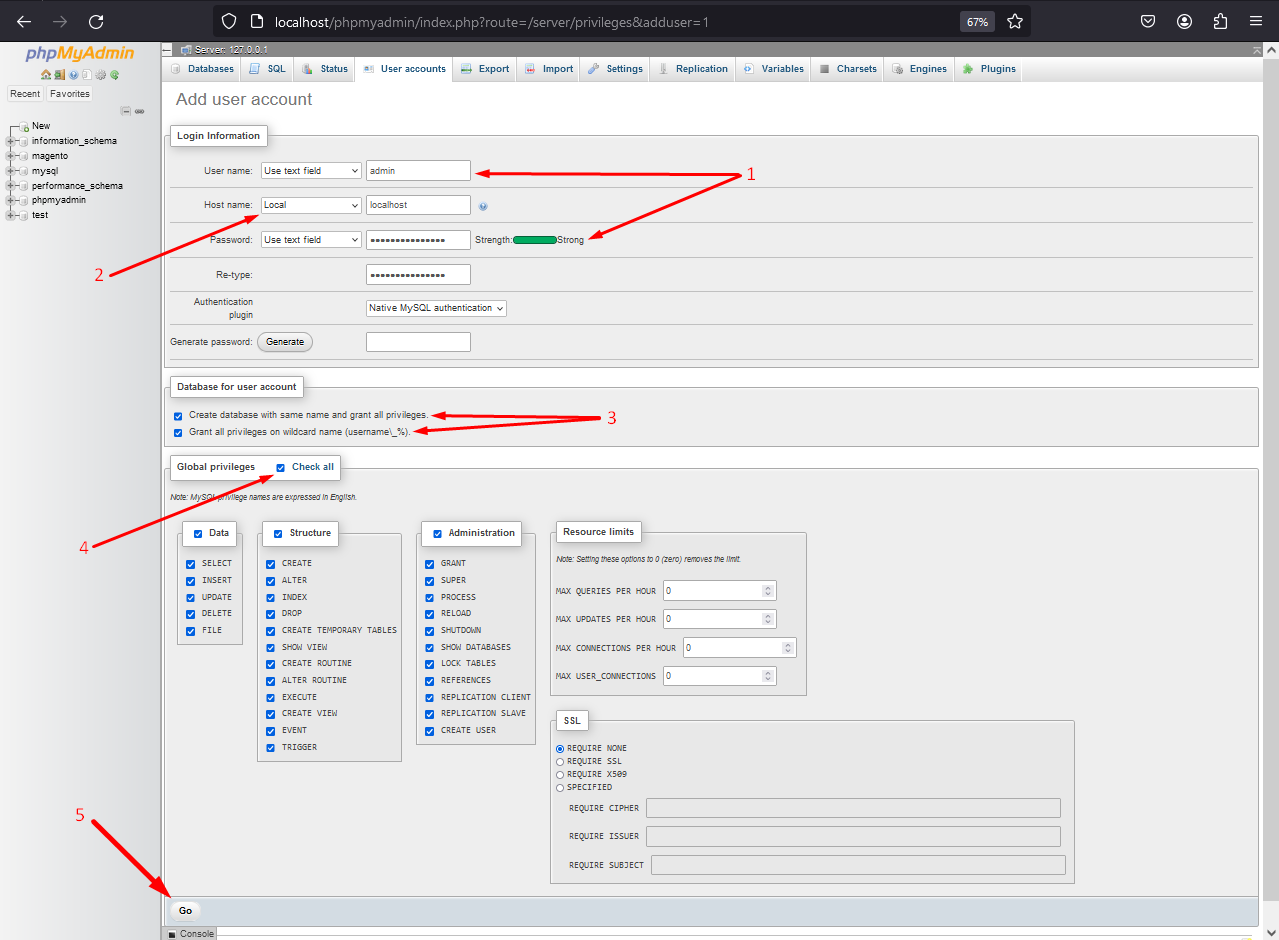
- For this tutorial let’s use the following credentials,
username = ‘admin’
password = ‘Admin@123’
- Select
'local'as the hostname. - Choose the options as instructed and proceed by clicking
'Go'. (This will create a database with a name same as the user account and grant all privileges necessary for the user to configure the database.)
Step 3 – Install OpenSearch
- Download OpenSearch2-12-0-win64.zip and extract the .zip file.
- Open
'opensearch.yml'located in'opensearch-2.12.0\config'folder. - Add the following code and save the file.
# Bind OpenSearch to the correct network interface. Use 0.0.0.0
# to include all available interfaces or specify an IP address
network.host: 0.0.0.0

# Unless you have already configured a cluster, you should set
# discovery.type to single-node, or the bootstrap checks will
# fail when you try to start the service.
discovery.type: single-node

# If you previously disabled the Security plugin in opensearch.yml,
# be sure to re-enable it.
plugins.security.disabled: false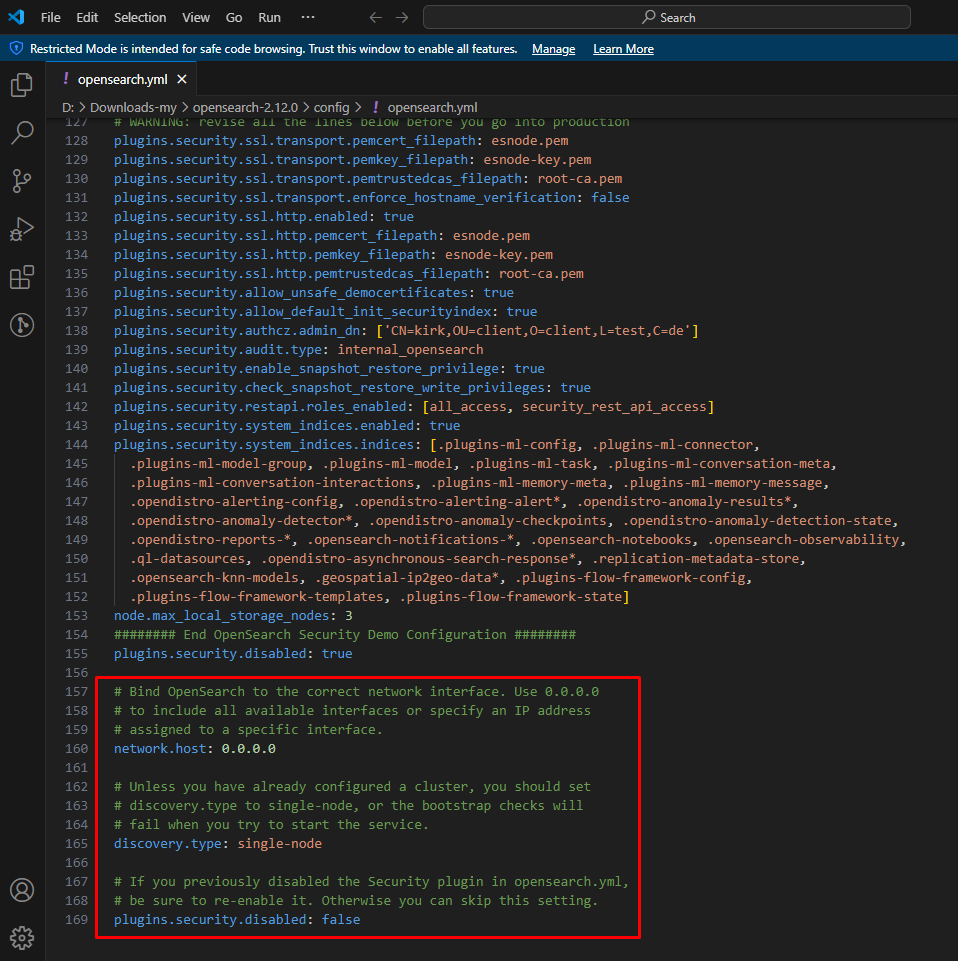
- Open
'jvm.options'located in'opensearch-2.12.0\config'folder. - For optimal program performance, modify the initial and maximum heap sizes to half of your available memory.
"As an example, if your computer has 8GB of memory; then you should set the heap sizes to 4GB.
-Xms4g
-Xmx4g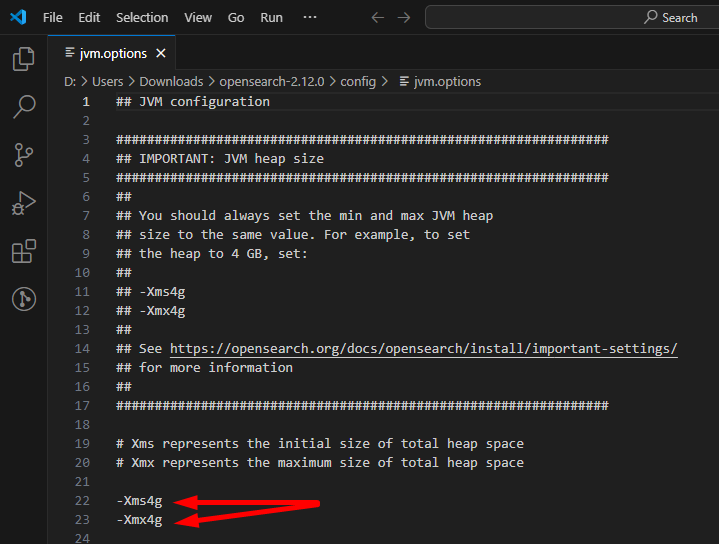
- In the windows search bar, search for ‘edit environment variables for your account’.
- Choose ‘New’ and enter the following values.
Variable name = OPENSEARCH_JAVA_HOME
Variable value = \path\to\opensearch-2.12.0\jdk- Select
'Ok'.

- Refer to this documentation if you encounter any issues with opensearch installation or runtime. “Opensearch windows documentation”
Step 4 – Install Composer
- Click the following link to download composer, https://getcomposer.org/Composer-Setup.exe .
- Install the downloaded setup.
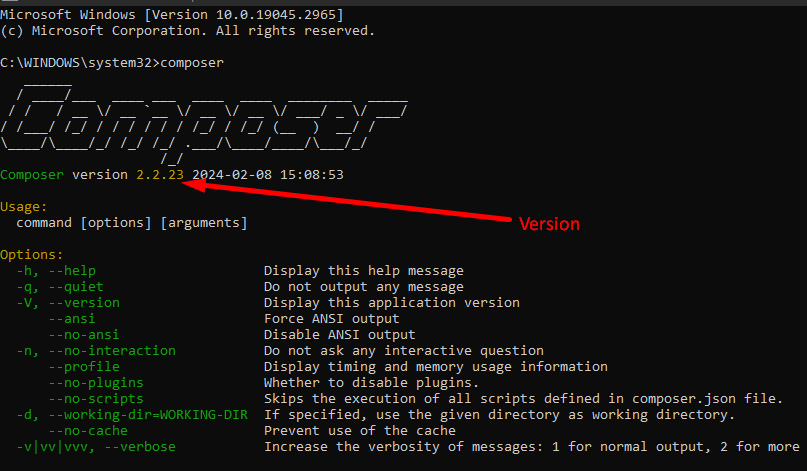
- For compatibility, we recommend downgrading composer to the version 2.2. Follow the instructions.
- Open the command prompt and type,
composer self-update --2.2- Restart the command prompt
- Type ‘composer’ to check whether the installation was succeed.
Step 5 – Install Magento 2
Download Magento 2
- Navigate to the
'htdocs'folder within the XAMPP installation folder. - Select the quick access bar and copy the path.
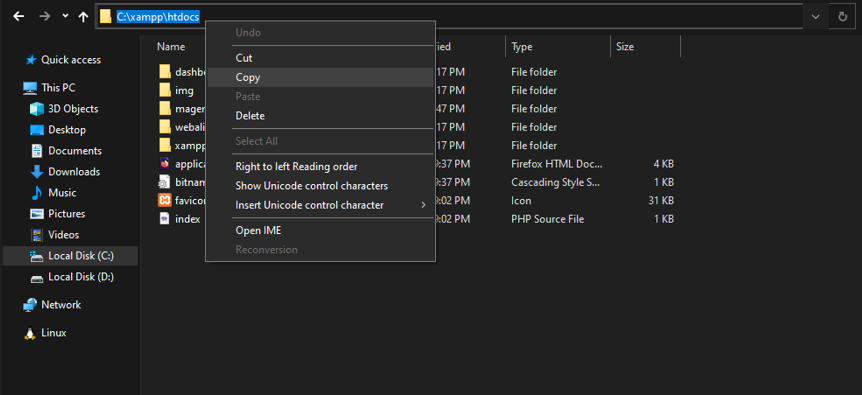
- Open
cmdand input the following command,
cd C:\xampp\htdocs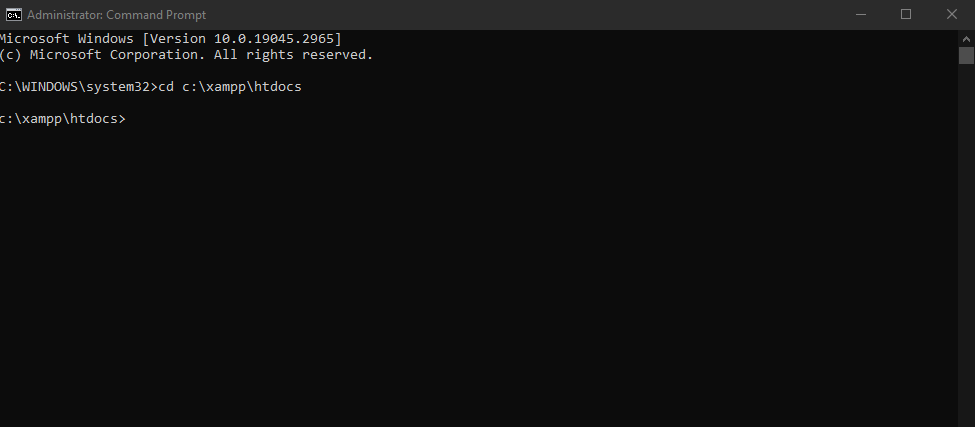
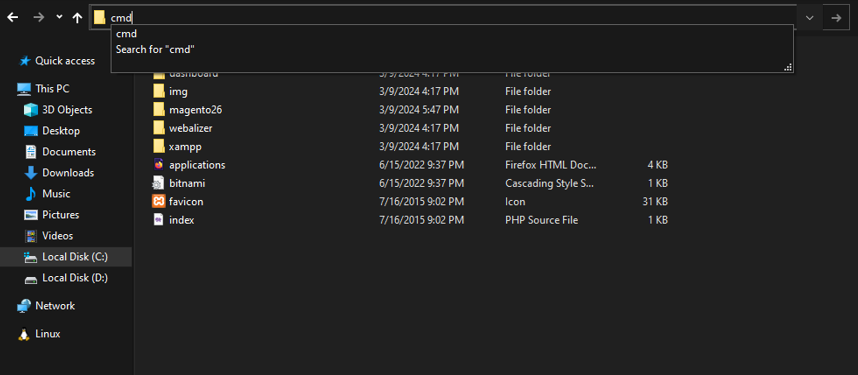
- Else, you can directly access the ‘
XAMPP directory\htdocs‘ folder. Simply click on the quick access bar and type ‘cmd‘ to open Command Prompt from that location.
- Execute the following command to download Magento 2.
composer create-project --repository-url=https://repo.magento.com/ magento/project-community-edition=2.4.6“It’s recommended to avoid renaming folders until the Magento 2 installation is complete to minimize errors. Hereby, all directory locations will be referred to by their default names.”
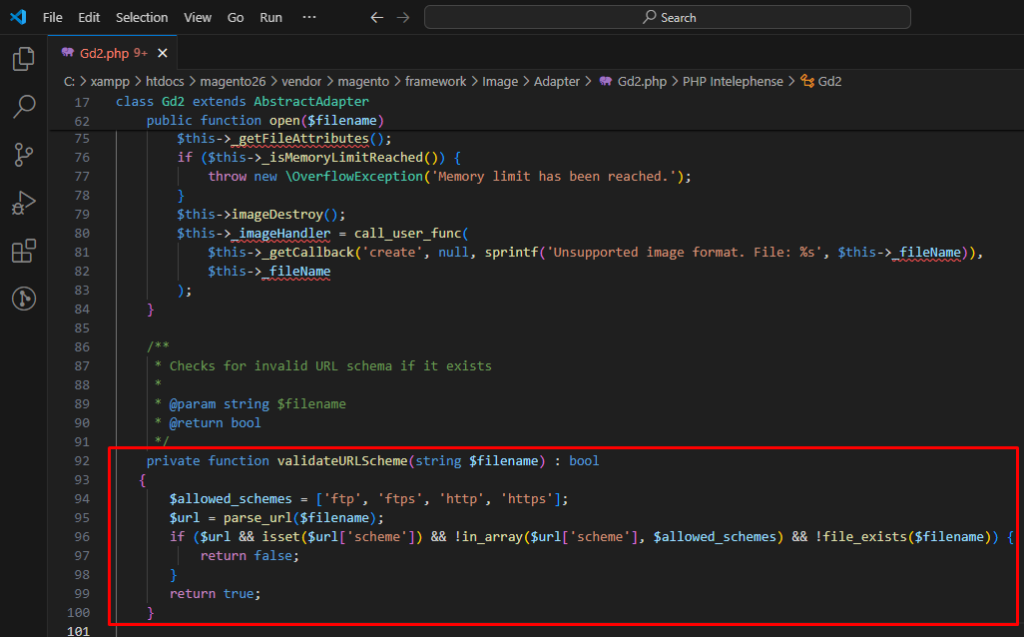
- After downloading, open the following document ‘
C:\xampp\htdocs\project-community-edition\vendor\magento\framework\Image\Adapter\Gd2.php'. - Locate
'validateURLscheme'and update the code with the following. Why replacing the code?
private function validateURLScheme(string $filename) : bool
{
$allowed_schemes = ['ftp', 'ftps', 'http', 'https'];
$url = parse_url($filename);
if ($url && isset($url['scheme']) && !in_array($url['scheme'],
$allowed_schemes)&& !file_exists($filename)) {
return false;
}
return true;
}
Install magento 2
- Launch command prompt and
'cd'to the magento directory.
cd c:\xampp\htdocs\project-community-edition- Enter the following command.
php bin/magento setup:install
--base-url=http://localhost/project-community-edition/
--db-host=localhost
--db-name=yourdbname
--db-user=yourdbuser
--db-password=yourdbpassword
--admin-firstname=admin
--admin-lastname=admin
[email protected]
--admin-user=admin
--admin-password=admin123
--language=en_US
--currency=USD
--timezone=America/Chicago
--use-rewrites=1
--backend-frontname=admin
--search-engine=opensearch
--opensearch-host=localhost
--opensearch-port=9200- Make sure to change the values according to your database.
- base-url = path where your magento directory exists
- db-host = host name of your host
- db-name = database name which you have created previously
- db-user = database username which is same as the database name
- db-password = your database password
- admin-firstname= your first name
- admin-lastname = your last name
- admin-email = your e-mail address
- admin-user = admin name for your magento admin panel
- admin-password = admin password for your admin panel
- Make sure to change the values according to your database.
Configure Magento 2
Part 1
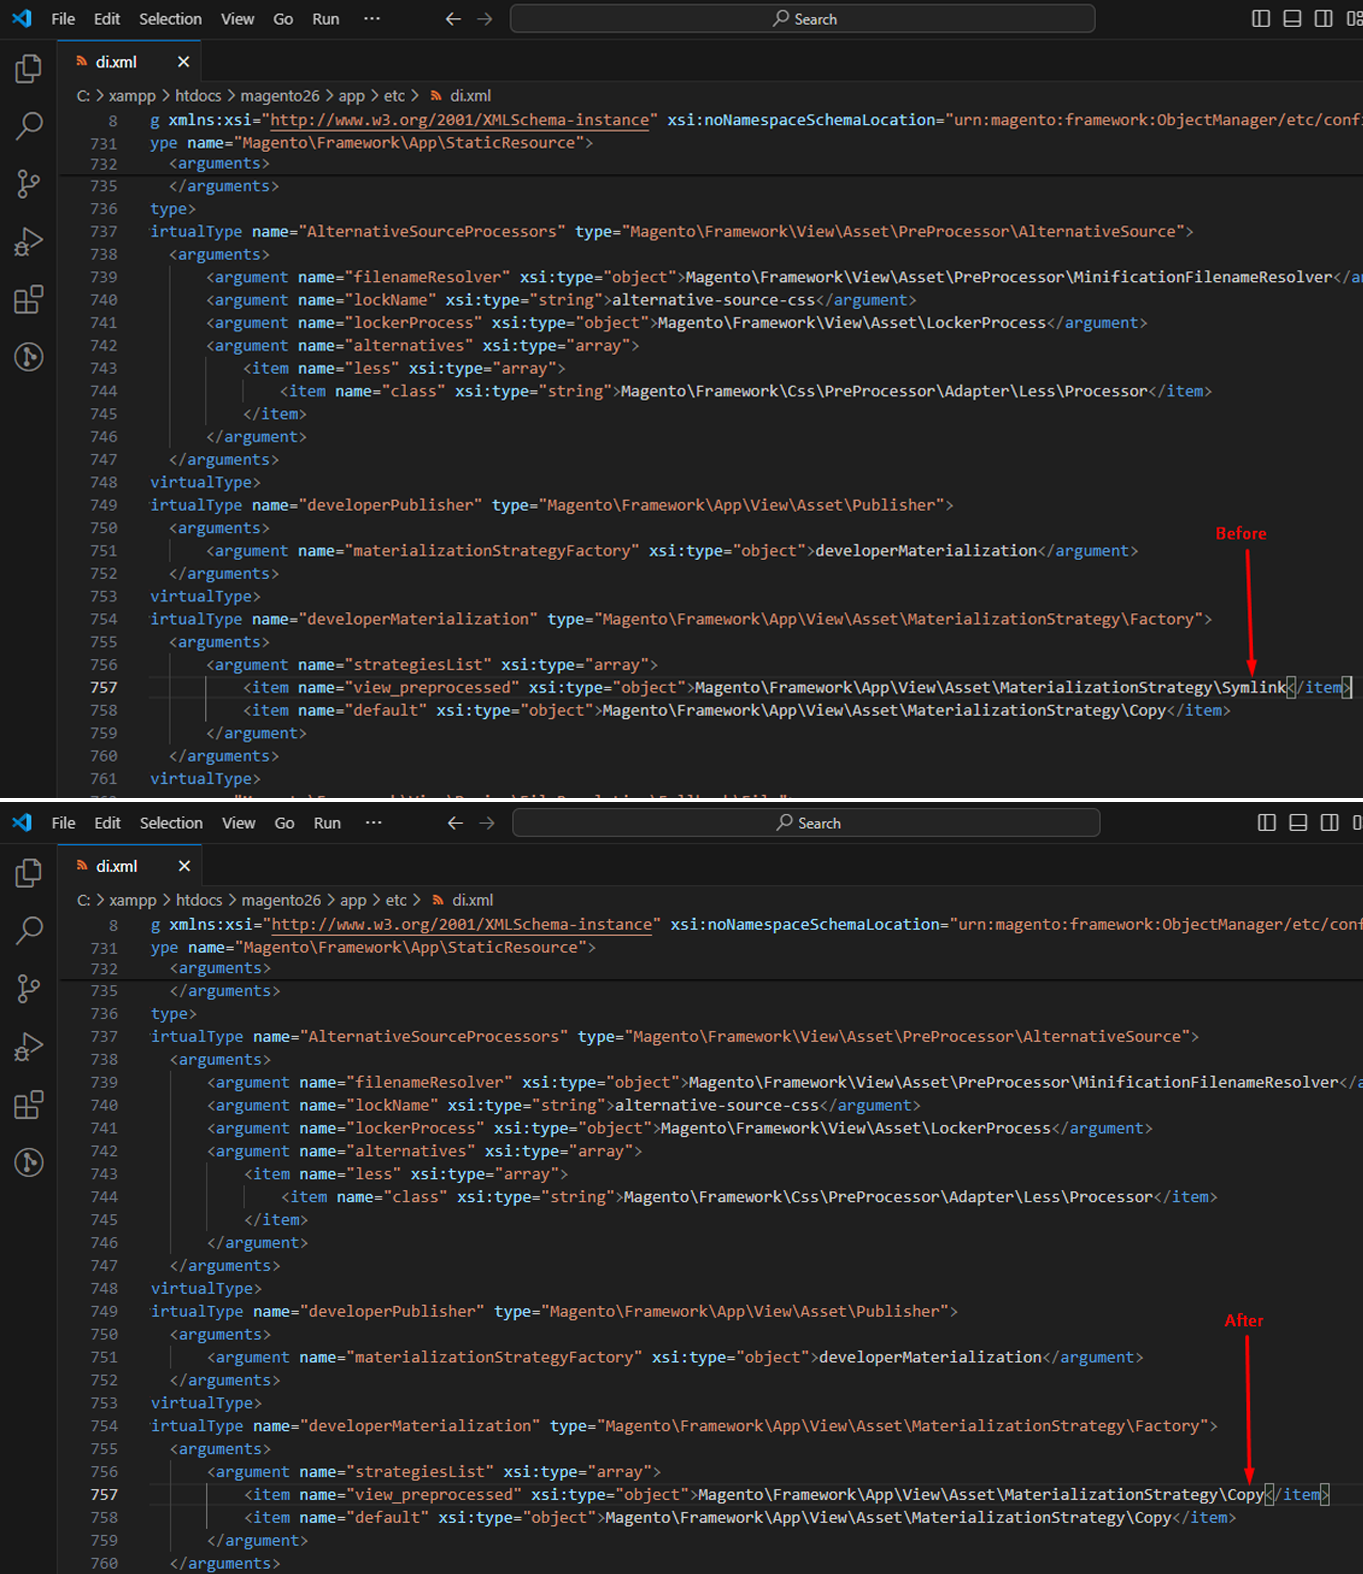
- Go inside the file ‘
c:\xampp\htdocs\project-community-edition\app\etc\di.xml'. - Find
'Symlink‘ and replace it with'Copy'.
Part 2
- Open, ‘
c:\xampp\htdocs\project-community-edition\vendor\magento\framework\View\Element\Template\File\Validator.php'. - Replace line 138 with,
$realPath = str_replace('\', '/',$this->fileDriver->getRealPath($path));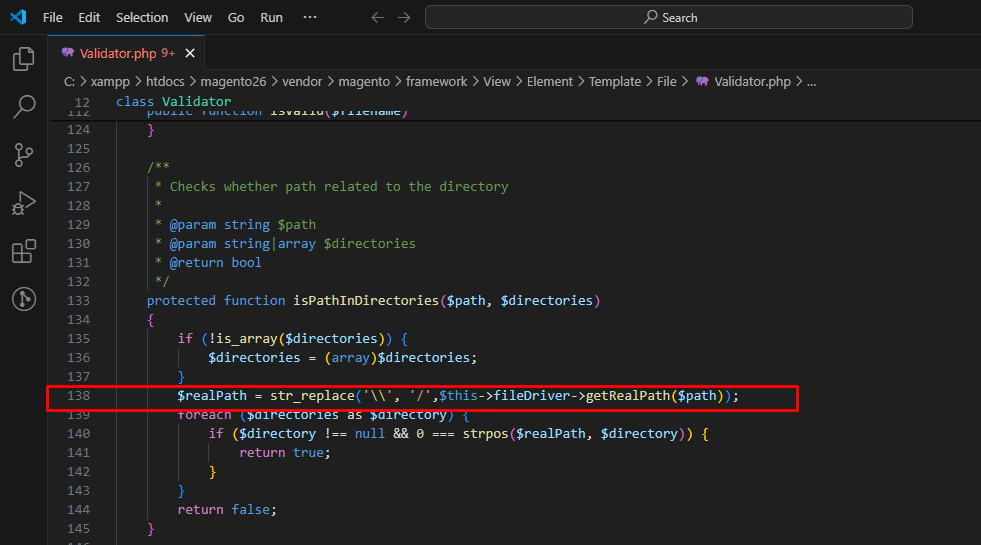
Part 3
- Run the following commands in cmd one after another, learn more about magento commands.
php bin/magento indexer:reindex
php bin/magento setup:upgrade
php bin/magento setup:static-content:deploy -f
php bin/magento cache:flush
php bin/magento module:disable Magento_AdminAdobeImsTwoFactorAuth Magento_TwoFactorAuth
Part 4
- Copy
'index.php'and'.htaccess'from the'pub'folder and paste them on magento directory. - Find
'require_DIR_'in the ‘index.php'and replace it with,
require_DIR_ . '/app/bootstrap.php';Part 5
- Go to PHP My Admin, http://localhost/phpmyadmin and open the database you created previously.
- Execute the following code in the
'SQL'tab,
INSERT INTO core_config_data (config_id, scope, scope_id, path, value, updated_at) VALUES (NULL, 'default', '0', 'web/secure/base_static_url', 'http://localhost/project-community-edition/pub/static/', current_timestamp());
INSERT INTO core_config_data (config_id, scope, scope_id, path, value, updated_at) VALUES (NULL, 'default', '0', 'web/unsecure/base_static_url', 'http://localhost/project-community-edition/pub/static/', current_timestamp());
INSERT INTO core_config_data (config_id, scope, scope_id, path, value, updated_at) VALUES (NULL, 'default', '0', 'web/secure/base_media_url', 'http://localhost/project-community-edition/pub/media/', current_timestamp());
INSERT INTO core_config_data (config_id, scope, scope_id, path, value, updated_at) VALUES (NULL, 'default', '0', 'web/unsecure/base_media_url', 'http://localhost/project-community-edition/pub/media/', current_timestamp());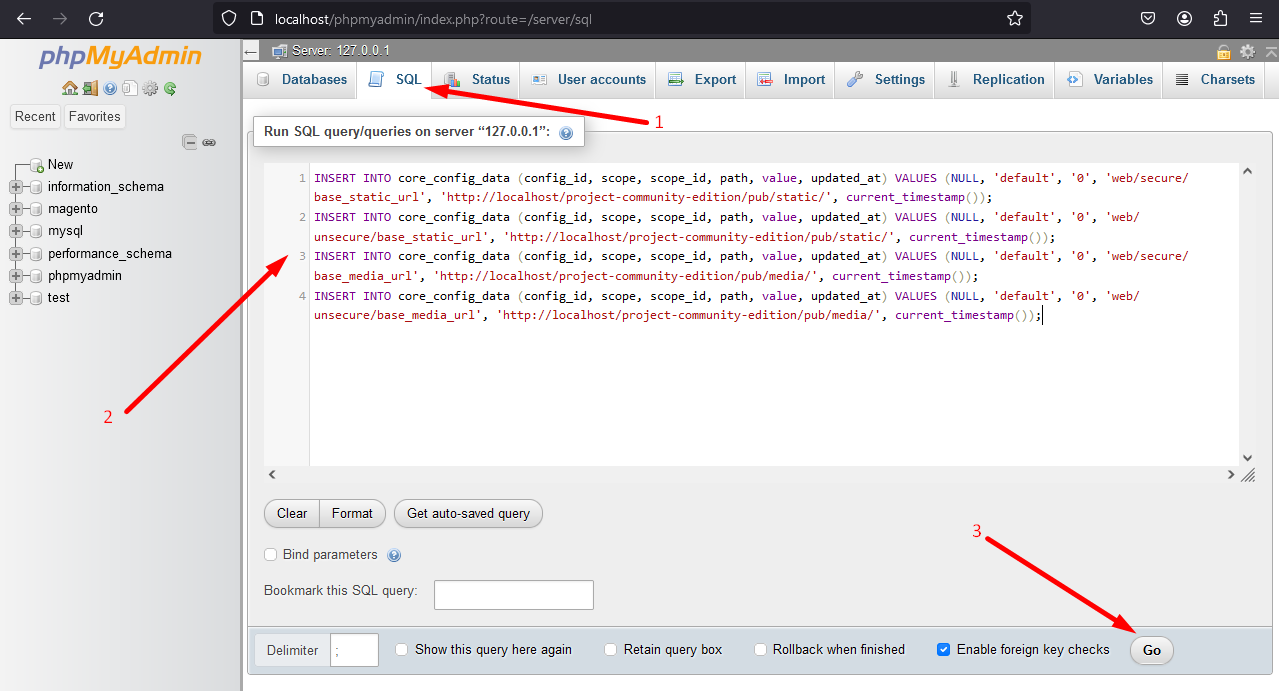
“Newly entered data may look like this”

Part 6
- Open command prompt, cd to the magento directory,
cd C:\xampp\htdocs\project-community-edition- Run the following command to clear cache.
php bin/magento cache:flushStep 6 - Log into Magento 2
- Open Magento 2, http://localhost/projectcommunity-edition.

- To visit the backend, http://localhost/project-community-edition/admin.
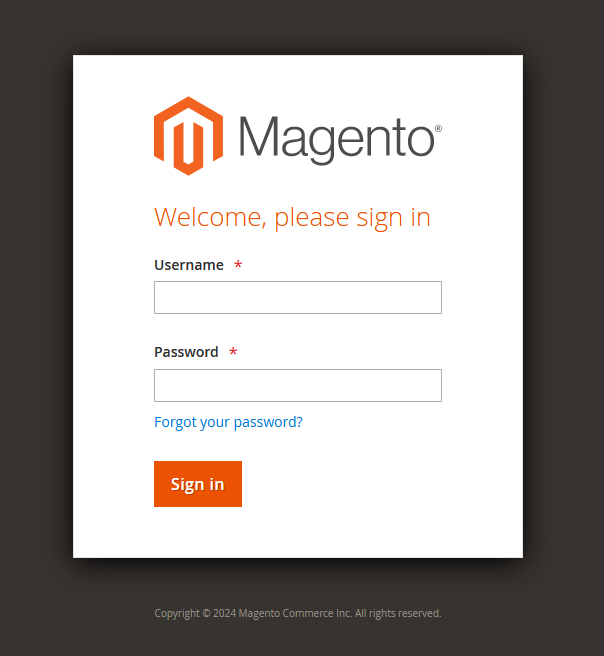
- Enter the admin-name and admin-password you have created previously and login.
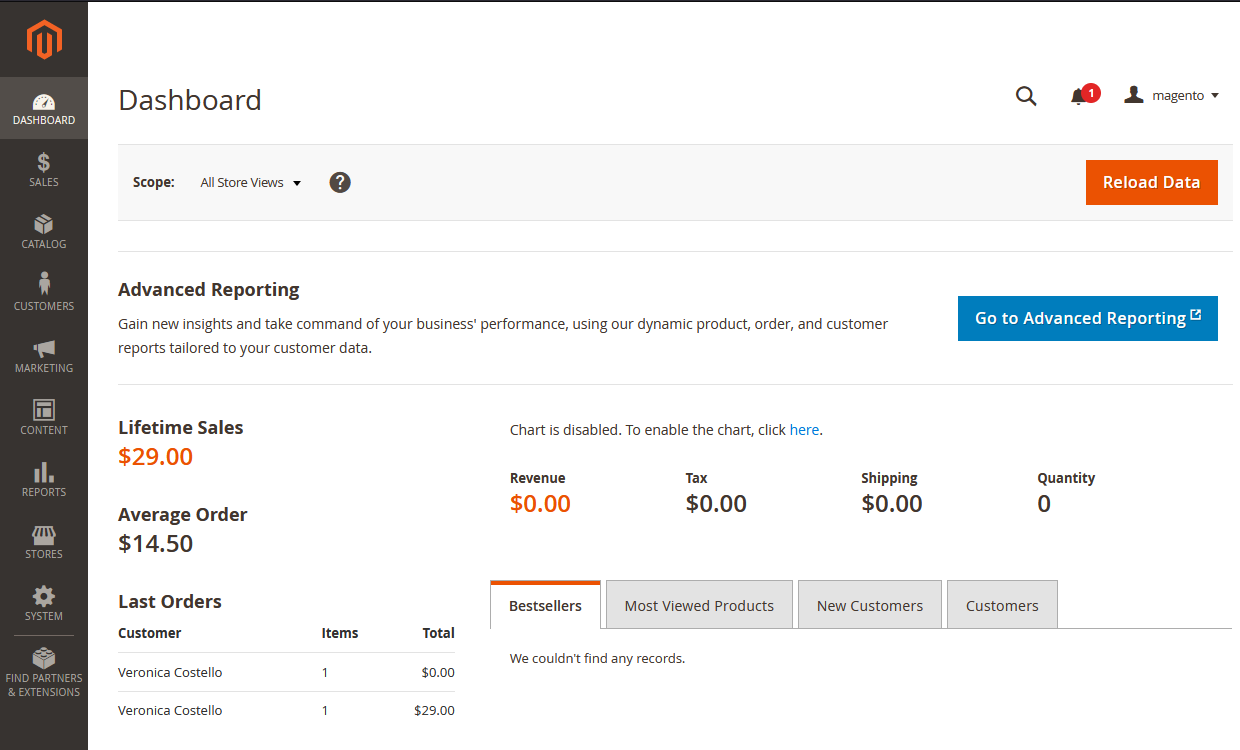
- Your dashboard will look like this.
Conclusion
In conclusion, installing Magento 2 can open up a world of possibilities for eCommerce developers. The step-by-step guide provided in this article aims to simplify the process, making it accessible for everyone.
Remember, if you encounter any difficulties or have questions along the way, don’t hesitate to drop a comment below the article. I’ll do my best to assist you and address your concerns.
Your feedback is valuable, and sharing your experiences can contribute to the community. If you found this guide helpful, please take a moment to like and share it.
Thank you for reading this guide, and best of luck with Magento 2!


